27
Planking2003
Winterton Boat Building and Community Museum, Newfoundland and Labrador, Canada
28
The first plank, called the binding strake, because it tended to bind the hull together, was temporarily clamped into place so its shape could be marked along the top batten. This top plank could be a wide board since it would have a reasonably straight run with minimal twisting compared to the bottom planks.29
Planing a plank2003
Winterton Boat Building and Community Museum, Newfoundland and Labrador, Canada

30
After selection and marking, the plank board was planed to the correct shape needed.Planks were shaped from the rough sawn boards using ripsaws, axes, drawing knives and a long hand plane. Great skill with the hand plane was required to finish each plank edge so that it fitted tightly against the abutting plank on the inside and left a slight seam on the outside to take the oakum (tarred rope fibers), used for caulking (filling the boat's seams). This meant that each plank edge would be beveled depending on the shape of the hull at each point. Thus the edge bevel was never the same for the entire length of the plank and varied considerably for each plank. The final fit required continuous fitting and shaping during which the plank would be held in place temporarily by clamps, marked for removal of additional material then returned to the bench for planing. Builders often remarked that one could never have enough clamps on hand during the planking process. C-clamps were preferred and various sizes were used.
31
Hollowing plane2003
Winterton Boat Building and Community Museum, Newfoundland and Labrador, Canada

32
For planks used at or near the crop of the bulge (the point where the hull shape changes from side to bottom) some hollowing on the inside might be necessary in order to fit the plank tightly against the curvature of some of the timbers. This was achieved using a hollowing plane, a hand plane with a convex blade, to remove some material from the center portion of the inside face of the plank. At other points on the hull where there might be a reverse curve (concave from the outside) plank boards might have to be planed so that the inside face was convex. Another strategy to ensure snug fitting on the timbers was to use narrower plank at the locations showing more extreme curvatures. Typically plank widths varied from two inches to six inches. Some builders preferred to use narrower boards for ease of planking. However, the strip planking technique, whereby all planks are as narrow as 2 inches and are edge-nailed to each other, was never used at Winterton.33
Planking2003
Winterton Boat Building and Community Museum, Newfoundland and Labrador, Canada

34
After careful sizing, the binding strake (top plank) was nailed to the stem and all of the timbers. As the planks were added, the battens, which run horizontally across the length of the boat, were removed.Planks were fastened using galvanized nails. In the earliest days these would have been square-cut nails. Ordinary round, hot-dipped, galvanized nails were used in later years and are still being used today. Nail heads were countersunk in order to allow fairing (smoothing) of the hull when all planks were installed. Plank ends at the stem were nailed to the stem piece as well as to the apron (a deadwood behind and attached to the stem).
35
Planking2003
Winterton Boat Building and Community Museum, Newfoundland and Labrador, Canada

36
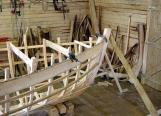
The binding strake was installed on both sides of the boat before any subsequent planks were sized, planed and attached.Planking began at the top of the boat and worked its way down towards the crop of the bulge (where the hull shape changed from side to bottom). This meant the installation of three to five planks on each side before turning the boat on one side in order to start planking from the keel up.
While this sequence was common other planking patterns were used including starting at the binding strake and planking down to the garboard. Using either method it was important to alternate from one side to the other as planking proceeded in order to ensure the hull shape remained stable. Once a particular plank was shaped for a location on the starboard or port side an identical plank could be shaped from it for installation on the opposite side.
37
Cutting the timber tops2003
Winterton Boat Building and Community Museum, Newfoundland and Labrador, Canada

38
The tops of the timbers that extended above the top plank were now removed using a handsaw.39
Handsaw2003
Winterton Boat Building and Community Museum, Newfoundland and Labrador, Canada
